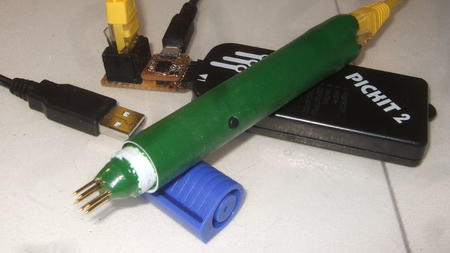
I recently had to program quite a few microcontrollers and got annoyed at one hand having to both hold the PCB and use the keyboard to program a chip. Therefore, I decided to upgrade my programming pen, so that I could trigger programming with its build-in pushbutton. The solution I came up with was to add a tiny USB keyboard circuit to the pen’s interface.
Design
One method to have the pushbutton trigger a programming command would have been to add a microchip to the pen’s interface and connect it to the PC using a USB to serial converter. The microcontroller could then sent some data to the PC every time the button is pushed. However, that would also required a script on the PC side to check whether the pen was sending data. What I wanted was a universal interface, which could be used to program any type of microcontroller, which wouldn’t require any scripts or drivers. What I came up with was to add an USB keyboard interface to the pen.
In order to make the pen work no matter which command needs to be executed to program a chip, I decided it would send the arrow up keystroke followed by an enter. That way, I can just type the programming command (e.g. “make flash”) once in a terminal window and pressing the programming pen’s button afterwards will make the same command execute.
I did not want to increase the size of the programming adapter, so my build space was extremely limited. I found V-USB, a software USB driver for Atmel AVR chips. That website contains a lot of links to example projects, one of which is a self-calibrating ATTiny45 USB keyboard interface. The ATTiny45 is a small 8 pin chip which just fit in the space I had available on the pen’s interface. Due to the self-calibrating code, it did not require an external crystal, which is normally needed due to frequency precision requirements of the USB interface. Basically, that project was a perfect starting poattachments_refint and someone had already done most of the work for me. Excellent! The circuit I put together is shown in the schematic below.
Building it
Since size requirements dictated it, and I prefer it anyway, only SMD components were used. I didn’t bother with a custom PCB and build it all on protoboard, using PTFE coated 30 AWG wire for the interconnections. The components are quite large (0603 resistors and capacitors, SOD-323 diodes, SOIC chip) and soldering them did not really pose a problem. The micro USB connector on the other hand was quite a nightmare to solder. Since I was working on protoboard, I had to make connections to the USB connector using wire. However, the connector’s pins are so tiny (0.25 mm wide, 0.25 mm long and 1.3 mm apart) that even under a stereo microscope, I was barely able to see them. Thus, I spend an extremely frustrating one and a half hours soldering four wires to that connector. Once all four wires were properly connected, I covered them in epoxy to make sure they wouldn’t come lose. The end result is really compact and pretty neat, as you can see in the picture below.

The firmware I wrote is heavily based on the EasyLogger code from the V-USB website. All I had to do was remove some ADC related code and rewrite a few functions to generate the appropriate keystrokes when the pushbutton is pressed. I also added an improved oscillator calibration routine that I found on the Code and Life blog. The USB configuration was slightly modified as well, so that when the pen is plugged in this shows up in my linux logfiles:
[anthony@desktop ~] $ dmesg | tail
usb 8-2: new low speed USB device number 81 using uhci_hcd
usb 8-2: New USB device found, idVendor=4242, idProduct=e131
usb 8-2: New USB device strings: Mfr=1, Product=2, SerialNumber=0
usb 8-2: Product: Programming Pen
usb 8-2: Manufacturer: AnthonyVH.com
usb 8-2: configuration #1 chosen from 1 choice
input: AnthonyVH.com Programming Pen as /devices/pci0000:00/0000:00:1d.2/usb8/8-2/8-2:1.0/input/input49
generic-usb 0003:4242:E131.0034: input,hidraw2: USB HID v1.01 Keyboard [AnthonyVH.com Programming Pen] on usb-0000:00:1d.2-2/input0
All in all, this little upgrade makes my pen a lot easier to use. It makes using it quite a bit faster as well, since I can now use both hands to hold the pen and the PCB, instead of one hand having to switch back and forth between the PCB and the keyboard. Of course, the pen can still be used without the USB interface, since it is completely independent from the programming pins.

